Jenkins Agents — Internal Documentation
Purpose
This document describes the Jenkins build agents used by Appcircle: where they run, how they are prepared on Proxmox, and the procedure for cutting a new agent version (upgrading the underlying template and rolling new agents out to Jenkins).
Note
"Agent" here refers to the Jenkins build agents used by Appcircle's internal CI. This is a different concept from the Appcircle Runner/Agent runtime described in Runner Infrastructure.
Scope
This document covers:
- Where Jenkins agents live and how they are organized
- Creating a new agent template version on Proxmox
- Provisioning a new agent VM from a template and registering it with Jenkins
- Rolling new agents into the pool safely
Overview
Jenkins agents are hosted as VMs on the Proxmox cluster, on the pve3 host. Each agent VM is named jenkins-agent-<n> (for example jenkins-agent-1, jenkins-agent-2, …). At present we operate 4 active agents.
Agents are produced from a versioned Proxmox VM template. Templates are named after the agent version they correspond to (for example jenkins-agent-v9, jenkins-agent-v10). When a new version is needed, we clone the previous template, modify the clone, and convert it back into a new template.
Why a template-per-version model
Keeping each version as its own template gives us a clean rollback target and makes it obvious which agents in the pool were built from which version.
Related infrastructure
- The Jenkins controller and the overall OVH layout — see OVH Infrastructure.
- The virtualization platform decision — see ADR-0004: Virtualization Platform.
Creating a New Agent Version
A new version starts as a full clone of the current template. Work happens inside that clone, and the result is converted into a new template that future agents will be cloned from.
1. Clone the current template
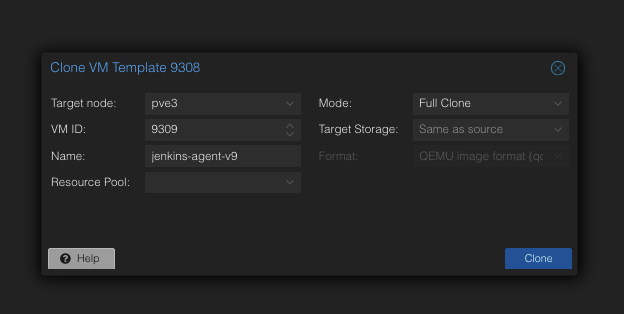
On Proxmox, right-click the existing template (e.g. jenkins-agent-v9) and choose Clone. Use the following settings:
- Mode:
Full Clone(a linked clone would tie the new version's lifecycle to the old template — do not use it). - VM ID: a unique ID in the
93xxrange. We reserve93xxfor agent templates so they are easy to spot next to the live agents (which sit in the300+range). - Name: the new version name, e.g.
jenkins-agent-v10.
Warning
Always confirm Full Clone and a free VM ID before submitting. A linked clone or an ID collision will cause cleanup work later.
2. Apply changes inside the clone
Start the cloned VM, SSH in, and apply whatever the new version requires — package updates, agent binary upgrade, toolchain changes, configuration fixes, and so on. Validate the changes on the VM itself before moving on.
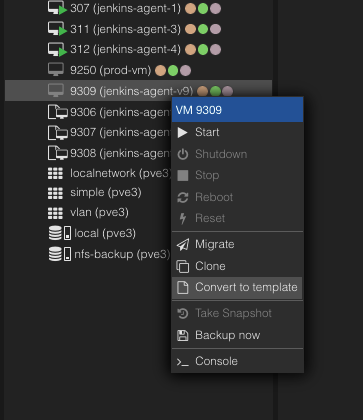
3. Convert the VM to a template
Once the VM is in the desired state, shut it down and right-click → Convert to template. The VM becomes the new immutable base for the next generation of agents.
Provisioning a New Agent from the Template
With the new template in place, each new agent in the pool is created by cloning it.
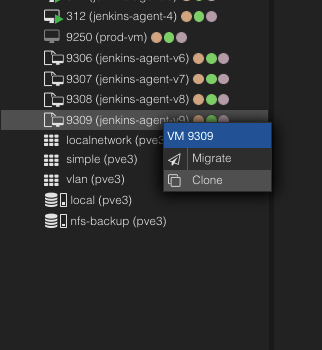
1. Clone the template
Right-click the new template → Clone. Required settings:
- Mode:
Full Clone. - VM ID: a free ID in the
300+range (do not reuse a previous agent's ID). - Name:
jenkins-agent-<n>— pick the next free index (jenkins-agent-1,jenkins-agent-2, …).
2. Configure networking via cloud-init
Look up the VM's allocated IP in Proxmox under Datacenter → SDN → IPAM, keyed by the new VM ID. Then open the VM's Cloud-Init tab in Proxmox and apply the IP/gateway configuration there before first boot.
3. Register the agent with Jenkins
The agent nodes already exist in Jenkins — there is no need to create a new node. Open the corresponding existing node in Jenkins and copy its agent token from the node details page. Then, on the VM:
sudo /configure-agent.sh <agent-name> <jenkins-token> <ingress-ip>
The script is baked into the agent template and is present on every VM cloned from it.
Where:
<agent-name>— the agent identifier as known to Jenkins, not the Proxmox VM name. The VM is namedjenkins-agent-<n>, but Jenkins uses the shorter form without thejenkins-prefix (e.g.agent-1,agent-2).<jenkins-token>— the token shown in the Jenkins node configuration for this agent.<ingress-ip>— the Jenkins ingress IP reachable from the agent network. Look this up in Datacenter → SDN → IPAM before each run.
After the script completes, verify in the Jenkins UI that the new node has connected successfully.
Verify ingress IP before rolling out
The ingress IP can change. Always re-check it in IPAM rather than reusing a value from a previous run.
Rolling Out the New Version
To swap an existing agent for one built from the new template without disrupting builds:
- In Jenkins, mark the agent being replaced as "Mark this node temporarily offline" so it stops accepting new jobs while letting current ones finish.
- Provision the replacement agent from the new template (see above).
- Verify the new agent picks up jobs correctly.
- Stop the old agent VM. Keep it in the stopped state for a grace period in case a rollback is needed, then delete it from Proxmox once the new agent is proven stable.
Outside of release days
On non-release days you can temporarily mark the other agents offline so that incoming jobs are forced onto the new agent. This lets you confirm the new version handles real workloads under load before rolling it out to the rest of the pool.
Related
- OVH Infrastructure
- Runner Infrastructure — Appcircle Runner/Agent (separate concept)
- ADR-0004: Virtualization Platform