Add a CDN endpoint for a resource server
This guide explains how to add a new CDN endpoint for a resource served from a Cloud Storage bucket behind a Google Cloud HTTPS Load Balancer with Cloud CDN.
This is typically used when a new resource type/service (e.g.,
Xservice) needs to be distributed via a dedicated CDN domain.
Environment note (important)
In examples you may see dev2 (e.g., appcircle-dev2-...). dev2 is just an example environment identifier.
For your setup, replace it with the correct environment prefix, such as:
dev,dev2,prep,prod- or any other internal environment naming you use
Throughout this document we will use:
<env>as the environment prefix (example:dev2)
Scope
Covers:
- Creating/using the correct Cloud Storage bucket for the resource
- Determining whether the Resource Service or the resource owner service manages CDN behavior
- Adding a CDN mapping so the Resource Service can resolve resource type → CDN base URL
- Creating a Backend Bucket with Cloud CDN
- Ensuring the Load Balancer/CDN can read objects from the bucket
- Updating Load Balancer TLS certificates to include the new CDN domain
Prerequisites
-
Access to the relevant GCP project and permissions to manage:
-
Cloud Storage buckets
- Load balancers (backend buckets, URL maps, target proxies)
- Certificate Manager / Load Balancer certificates
- The CDN domain name (e.g.,
x-cdn.<env>.appcircle.ioor any approved domain) and DNS control for validation/provisioning - A decision on ownership model (explained below)
1) Configure the Cloud Storage bucket
Each service/resource must have its bucket configured using the team convention. The prefix is important and is environment-dependent.
Recommended pattern:
appcircle-<env>-resource-<resourceTypeOrService>
Examples:
appcircle-dev2-resource-buildappcircle-dev2-resource-xservice
Tip: Use consistent casing and naming for bucket names and backend bucket names. Prefer lowercase for buckets.
1.1) Grant Load Balancer (Cloud CDN) access to the bucket
A backend bucket fetches objects from Cloud Storage. If your bucket is not public (recommended), you must grant Cloud CDN permission to read objects.
1.1.1) Find the Project Number
You will need the Project Number (not Project ID) to reference the Cloud CDN cache fill service account.
Option A — Google Cloud Console
- Open Google Cloud Console.
- Go to IAM & Admin → Settings (or the project dashboard).
- Copy the Project number.
Option B — gcloud CLI
# Replace with your project id
PROJECT_ID="<project-id>"

# Prints only the numeric project number
gcloud projects describe "$PROJECT_ID" --format="value(projectNumber)"
1.1.2) Grant bucket read access to the Cloud CDN cache-fill service account
Cloud CDN uses a Google-managed service account in the following format:
service-<PROJECT_NUMBER>@cloud-cdn-fill.iam.gserviceaccount.com
Note: This service account is created automatically after you add at least one signing key to a backend bucket in the same project. If you try to grant access before that, the IAM command can fail because the service account may not exist yet.
Preferred (gcloud storage)
PROJECT_ID="<project-id>"
PROJECT_NUMBER="$(gcloud projects describe "$PROJECT_ID" --format='value(projectNumber)')"
BUCKET_NAME="appcircle-<env>-resource-xservice"

gcloud storage buckets add-iam-policy-binding "gs://${BUCKET_NAME}" \
  --member="serviceAccount:service-${PROJECT_NUMBER}@cloud-cdn-fill.iam.gserviceaccount.com" \
  --role="roles/storage.objectViewer"
Alternative (gsutil)
PROJECT_NUMBER="<project-number>"
BUCKET_NAME="appcircle-<env>-resource-xservice"

gsutil iam ch \
  serviceAccount:service-${PROJECT_NUMBER}@cloud-cdn-fill.iam.gserviceaccount.com:objectViewer \
  "gs://${BUCKET_NAME}"
1.1.3) Optional: verify the binding
BUCKET_NAME="appcircle-<env>-resource-xservice"

gcloud storage buckets get-iam-policy "gs://${BUCKET_NAME}" \
  --format="json" | grep "cloud-cdn-fill" || true
Recommended bucket posture: Uniform bucket-level access + Public access prevention enabled, and only allow Cloud CDN (cache-fill SA) + your required internal service accounts.
2) Identify how the service is configured
A resource can be configured in two different ways:
A) Managed by the Resource Service
- The Resource Service controls how CDN is applied.
- In this case, you must add a CDN mapping (next step) so the Resource Service knows which CDN endpoint to use for a given resource type.
B) Managed by the resource owner service
- The service that owns the resource decides whether a request should use CDN or not.
- If that service supports CDN, it must explicitly request CDN usage in code.
Example reference: CodePush (the owner service controls CDN usage).
If the resource owner service manages CDN behavior, there may be no additional infra work beyond what that service already provides.
3) Add CDN mapping to the Resource Service
When the Resource Service manages CDN usage, it needs a mapping to resolve:
<ResourceType> -> <CDN Base URL>
Configure the environment variable in the Resource Service:
ASPNETCORE_S3_CDN_MAPPING="Build=https://<env>-cdn1.appcircle.io,Distribution=https://<env>-cdn2.appcircle.io,Xservice=https://x-domain.example.com"
Notes:
- Replace
<env>with your environment prefix (e.g.,dev2,prep,prod). - Use the resource type keys exactly as expected by the Resource Service (case-sensitive depending on implementation).
- Ensure the CDN URL uses HTTPS.
- Add new mappings without removing existing ones.
4) Configure Google Cloud Load Balancer for the new CDN domain
4.1) Create a Backend Bucket (Cloud CDN enabled)
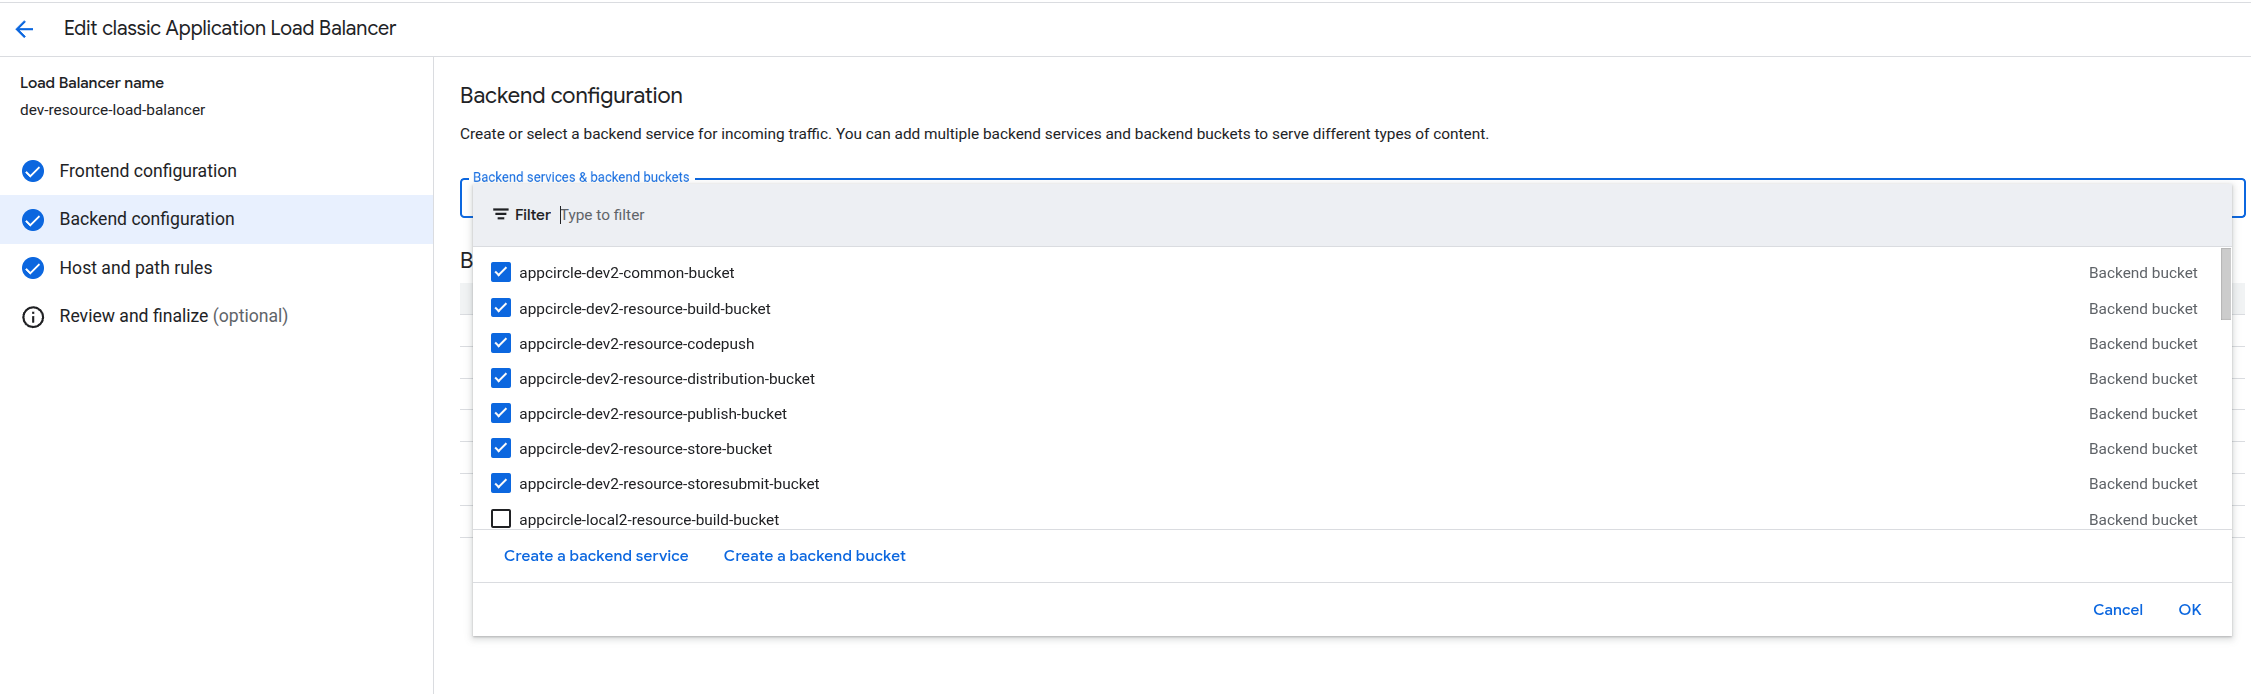
- Open the relevant HTTPS Load Balancer in GCP.
- Edit the Load Balancer.
- From Backend configuration, create a new backend.
- Select Create a backend bucket.
-
Provide a backend bucket name following convention, for example:
-
appcircle-<env>-resource-xservice -
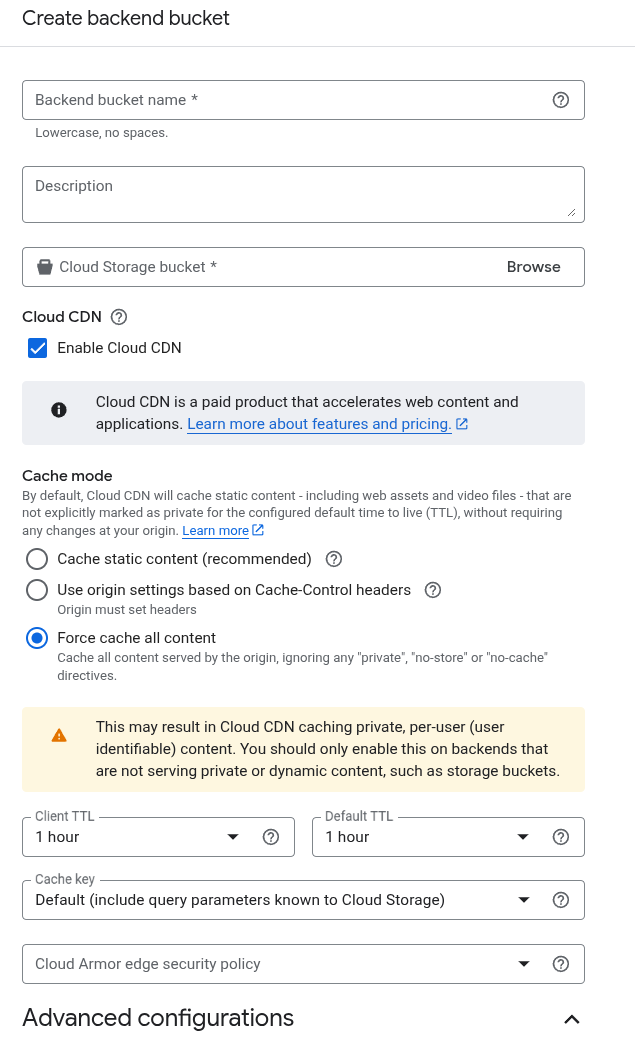
Set the backend bucket options:
-
Backend bucket name:
appcircle-<env>-resource-xservice - Cloud Storage bucket: select the bucket created/configured in step 1
- Enable Cloud CDN: ✅ enabled
- Cache mode:
Force cache all content - Restricted content:
Restrict access using signed URLs and signed cookies -
URL signing key:
-
Click Add signing key and select the signing key.
-
Use the same signing key as other existing backend buckets (shared key convention).
-
Add Custom response headers (CORS):
-
Access-Control-Allow-Origin:* Access-Control-Allow-Methods:*Access-Control-Allow-Headers:*
Security note: Using
*for CORS is permissive. This is intentional for public distribution endpoints, but review if you serve sensitive content.
4.2) DNS + certificate provisioning
Before the Load Balancer can serve traffic on the new CDN domain, TLS certificates must include it.
-
Ensure the DNS record for the new CDN domain is prepared.
-
Follow your standard DNS delegation/records process.
-
Make sure DNS is in place so Google can validate domain ownership.
-
Go to the Load Balancer certificates page:
-
https://console.cloud.google.com/security/ccm/list/lbCertificates -
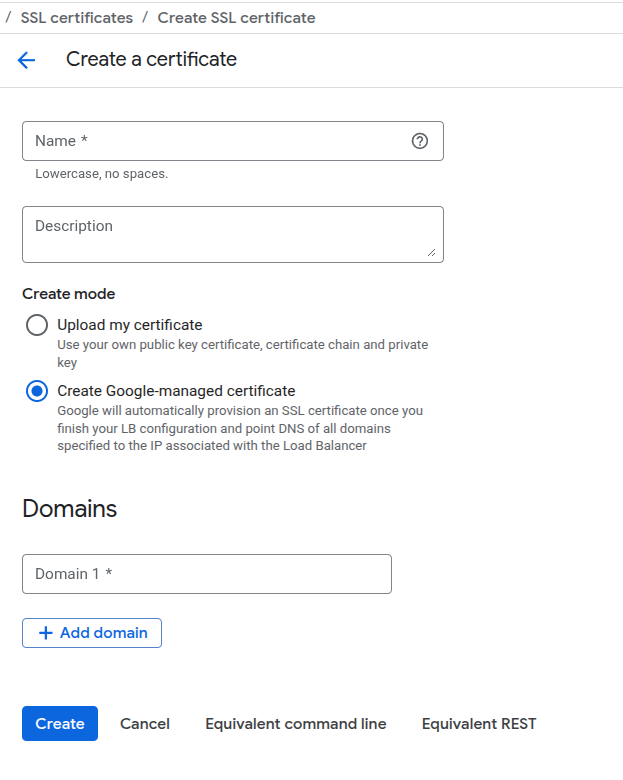
Create a new certificate object if required.
Because existing certificates are managed in versioned groups, you may need to clone the existing certificate set and bump the version.
Example:
- Current:
dev-resource-certs-v1 - New:
dev-resource-certs-v2
If you are operating on a different environment, use the matching prefix:
prep-resource-certs-v1→prep-resource-certs-v2prod-resource-certs-v3→prod-resource-certs-v4(example)
Process:
- Open the current version
- Copy all existing domains into the new version
- Add the new CDN domain for this resource
Why versioning? Some teams prefer immutable certificate sets; updating requires creating a new version that includes all previous domains + the new one.
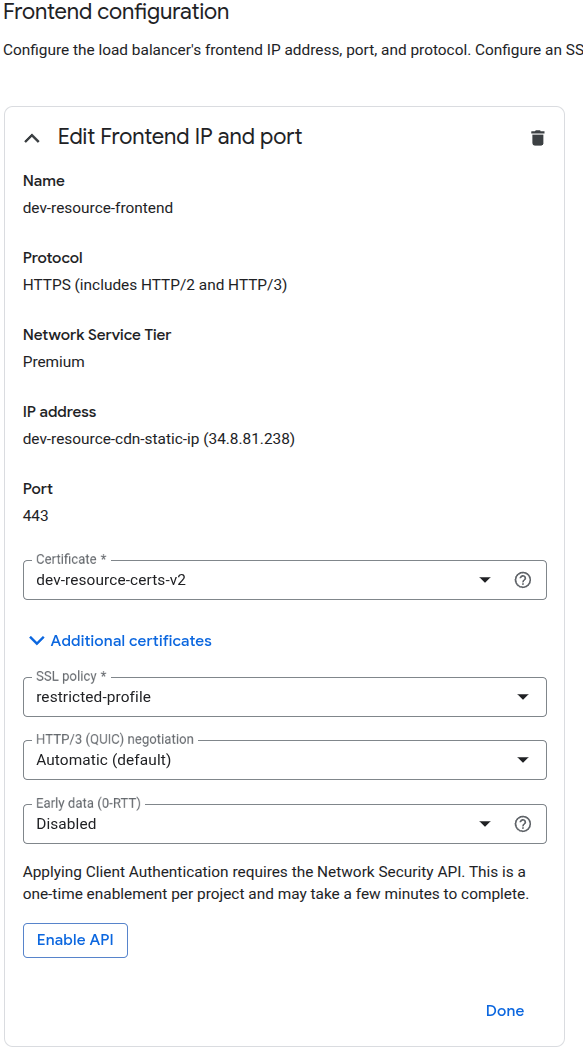
4.3) Update the Load Balancer to use the new certificate
After the certificate is created (and shows as provisioned/active):
- Go back to the Load Balancer configuration.
- Update the certificate selection to use the new certificate set/version.
- Save/Apply the changes.
5) Validation checklist
- Bucket exists and naming convention matches environment/service (
appcircle-<env>-resource-...) - Bucket posture reviewed (Uniform access / Public access prevention)
- Cloud CDN cache-fill service account has
roles/storage.objectVieweron the bucket - Resource ownership model confirmed (Resource Service vs owner service)
-
ASPNETCORE_S3_CDN_MAPPINGupdated (if Resource Service-managed) - Backend bucket created and points to the correct Cloud Storage bucket
- Cloud CDN enabled and cache mode configured
- Restricted content enabled and signing key configured (shared key)
- CORS headers added
- DNS records are in place and correct
- TLS certificate includes the new CDN domain
- Load Balancer updated to use the latest certificate set
- End-to-end test: access a known object via the new CDN domain and confirm response headers/cache behavior
Appendix: Example mappings
# Example: multiple resource types mapped to different CDN endpoints
ASPNETCORE_S3_CDN_MAPPING="Build=https://dev2-cdn1.appcircle.io,Distribution=https://dev2-cdn2.appcircle.io,Xservice=https://x-domain.example.com"